Pages

Wednesday, August 31, 2011

It's Playtime: Commotion in the Ocean


Summer may be coming to a close in San Diego, but for us locals, that just means less people at the beach.  I am looking forward to venturing back to the ocean sometime soon, but until then, I have these great ocean related projects from last weeks It's Playtime to keep my children busy.
Beansprouts Preschool Blog brought a bit of the sea inside with their Ocean Playdough Recipe.  I love the bright blue the icing coloring adds!   

Can't get to the ocean?  Why not bring the ocean to you with this terrific Ocean in a Bottle from Snails and Puppy Dog Tails.  It's easier then it looks and your little one will love watching the bubbles and waves they create from moving it around.

Sharks may be scary but this Shark Teeth Scissor Skills activity from daisysnu is not only cute, but a fantastic way to fine-tune those fine motor skills.

If you were featured this week, don't forget to grab your special "featured button."    


Now, on to this weeks play date! 
It's Playtime is a community and Thursday link-up hosted by:

* Rachele : Messy Kids (That's me!)
* Anna : The Imagination Tree
* Rachel : Quirky Momma
* Jamie : hands on : as we grow
* Jenny : Let the Children Play

How to Play :
* Link up a post about a playful learning experience enjoyed by kids.
* Give us love and pop a button into your post/blog. Invite your readers to the weekly play date!


* Stop by one of our blogs every Thursday and add your link about play. Your link will show up on each of the blogs in the It's Playtime community.
* Each week the playtime hosts will choose favorite posts to feature. (By linking you are giving us permission to use an image and link to you, if featured.)
* Be sure to visit some of the links that catch your eye. Commenting on posts that you find interesting or inspiring is a wonderful way to develop your own playful community.

Monday, August 29, 2011

What's for Lunch?

With school returning next week, and a picky eater who needs a lunch, I'm all in a frazzle about what to pack for her.  In the past I've qualified for discount lunches through the district, but this year our financial situation looks better on paper then it actually is, disqualifying us for reduced price lunches.  I wanted to pack more lunches for her this year anyway since there are days she doesn't eat at school because she doesn't like any of the choices offered her.  My daughter is a lot like I was at her age.  Lunch was always a battle for my parents.  I'd eat something for while, then decide I was bored, and want something else.  I also didn't eat the conventional PB&J because I didn't like peanut butter until I was in my 20s.  I remember eating bagel sandwiches (bagels didn't get as soggy as bread) for a while but my parents bought the cheapest lunch meat on earth so I quickly grew to despise the stuff.  And I didn't eat baloney either.  My parents loved when I worked in the cafeteria because it meant a month of free lunches that they didn't have to pack!

Now I am paying for all the hassle with a daughter who likes even less then I did.  She won't eat PB&J but she will eat baloney.  Heaven forbid I put cheese in her bag (although she loves it) because she claims that even with an ice pack, the cheese becomes "yucky".  She'll sometimes eat ham, usually will eat salami, but never eats turkey.  She loves grilled cheese but I can't pack that because it's "yucky" when it's cold (I don't blame her there!).  Baby carrots are sometimes, crackers too, and celery is a no, no, especially spread with cream cheese or peanut butter!  Do you see what I have to work with?

So I've been researching quick and easy lunches and although I may not have use for many of them, due to Miss Picky, I have found a number of great ideas the rest of you may enjoy.  I'd also love to hear from you all dear readers what you pack for you picky lunch eater.  It just may help!

My ideas for this coming year:
  • Homemade Lunchables- crackers (my kids like Ritz), cheese slices (or not if they get "yucky"), and a favorite lunch meat such as baloney or salami (or turkey or ham, whatever your child will eat).  Pair with whatever healthy food you can get your child to eat, such as fresh fruit and baby carrots.  
  • Homemade Pizza Pockets- My bread machine came with a great recipe for pizza dough but you could use refrigerator dough or your favorite recipe.  Roll dough to a long oval type shape (for whatever size pocket you think is best for your child.  This will take experimentation!)  Spread with pizza sauce and top with whatever your child likes on their pizza plus cheese.  Fold dough over creating a half circle shape (or calzone shape) and seal edges with a fork.  Bake at 400 degrees for 15-20 minuets if calzone sized.  Less time if making a much smaller pocket.  This is a recipe you must play with.  I'm still adjusting mine as my pockets are still coming out bigger then what I'd want to pack my daughter.  You can make these a head of time, reheat in the morning and wrap in foil to keep warm until lunch.  
  • Homemade muffins such as blueberry, zucchini (sneaking in veggies!) or apple packed alongside carrots or other veggies.  There are so many recipes out there reducing the amount of sugar that with a little research, you can find something that fits your lifestyle.  Most kids are more active at school so don't be afraid to give them carbs!  They will burn it off!  
  • Cold noodles packed alongside fresh fruit and veggies.  Cold noodles was my stable in high school.  I LOVED them!  My daughter likes them a little less, but sitting in her lunch box, they won't really be "cold" anymore.  Use fun noodle shapes or spirals, then you don't really have to pack a fork!  I think this will be a hit this year.
  • Hotdogs- Cook them in the morning and pack alongside a bun or slice of bread, packets of catchup and mustard, plus veggies and fresh fruit.  Or maybe you have a child that likes cold food.    When I was younger I liked cold and frozen hotdogs.  Give it a try!    
Veggie Options:
  • carrot sticks or baby carrots
  • jicama (My daughter discovered this over the summer and loved it.  It's crunchy and sweet!) 
  • celery sticks (add peanut butter or cream cheese for added nutrition)
  • sugar snap peas
  • red, yellow, or orange bell pepper slices (also sweet and crunchy)
  • mini  trees (broccoli)  
Lunch ideas from around the web:

Thursday, August 25, 2011

It's Playtime: Keeping it Simple

As teachers, homeschoolers, and parents, sometimes art projects seem to get away from us.  We tend to turn them into a big ordeal, or maybe we don't do them at all because we're avoiding all the work. But process art projects SHOULD be easy.  When I taught preschool, my motto was, "if it takes more then 5 minuets to set up, then you are doing too much."  For process art, you should generally open a cupboard, assess your supplies, and put together a project in a snap.  Kids are easy.  Mess is good.  Keeping it simple is key!

This week on It's Playtime, I'm featuring blogs who kept it simple when it came to art.  Because as parents and teachers, who really has time to complicate things?  

What could be simpler then painting a rock?  Playful Learners shared how Decorating Beach Pebbles can turn from a fun beach activity to an easy art project at home.  I love the simplicity of opening an old magazine to catch the mess rather then spreading newspaper all around the table and floor!  

How about some Magic Painting?  "Magic?" you say, "how is that simple?"  Well who hasn't done crayon resist painting at least once in their lives?  I spent a good portion of my elementary school years painting underwater scenes and haunted houses at home simply because I LOVED crayon resist painting!  Well, why not try it in preschool?  That's just what Pre-school Play did and their kids loved it!  Their paintings may not have been full of fish and mermaids, but they certainly were magic...and simple!  

Creativity My Passion used a Toothbrush as a Paintbrush for their art!  Who doesn't have an old (bleach gets the germies out!) or extra toothbrush laying around?  And Esther went beyond the toothbrush by turning it over and trying Tongue Cleaner Stamping.  Two projects in one!  Check out her blog because from there, she used the toothbrush for several more projects as well.      

If you were featured this week, don't forget to grab your special "featured button."


Now, on to this weeks play date! 
It's Playtime is a community and Thursday link-up hosted by:

* Rachele : Messy Kids (That's me!)
* Anna : The Imagination Tree
* Rachel : Quirky Momma
* Jamie : hands on : as we grow
* Jenny : Let the Children Play

How to Play :
* Link up a post about a playful learning experience enjoyed by kids.
* Give us love and pop a button into your post/blog. Invite your readers to the weekly play date!


* Stop by one of our blogs every Thursday and add your link about play. Your link will show up on each of the blogs in the It's Playtime community.

* Each week the playtime hosts will choose favorite posts to feature. (By linking you are giving us permission to use an image and link to you, if featured.)
* Be sure to visit some of the links that catch your eye. Commenting on posts that you find interesting or inspiring is a wonderful way to develop your own playful community.

Monday, August 22, 2011

Crayon Melt

One of the activities I remember fondly from my early school days was melting crayons on a hot plate.  With all the issues of safety, I don't think it's a common project these days, at least not in Kindergarten, but I have seen it popping up in the homeschool and preschool networks all over the web.  I decided it was time to take a risk and let my son try this fun activity.  
Unfortunately, I don't have a flat electric griddle.  I wish I did for the sole purpose of this project, but I had to work with what I had; my George Foreman grill with interchangeable plates.  I attached the griddle plate and covered it with foil.  I wasn't sure how messy my son would get.  Once it was warmed, I placed the construction paper over the foil.  
 Michael enjoyed watching the crayons melt over the paper.  
 One crayon just wasn't enough!  
The finished product.

My son is a boys boy; always going, always busy.  Projects never last for very long but he does seem to enjoy them.  This was a simple project to pull out that didn't require a lot of set-up so the fact that he finished in 5 minuets wasn't a big deal.  I definitely want to try this again when his sister is around!

Shared on:

Sunday, August 21, 2011

Raising Kids is Tough: Ask the Experts


My friend and one of the It's Playtime co-hostesses, Jamie of hands on: as we grow, has put together a great series called Raising Kids is Tough.  She has gathered a list of experts available to answer questions regarding eating habits, unwanted behaviors, social skills, and more.  What you need to do is follow her link and ask your questions.  Each month she'll choose 5 questions of a specific topic for the experts to answer.  The topic each month will be based on your questions and what people want to know.  Additional, topic related questions, will be asked via the hands on: as we grow facebook fan page for the experts, as well as the fans, to answer.

I encourage you to visit and ask your tough questions regarding child rearing.  It's true what they say, "It takes a whole village to raise a child."  These experts and the facebook community are part of your village and are here to help!  

Thursday, August 18, 2011

It's Playtime: Back to School with Fun Things to Do


I know many of you teachers, homeschoolers, and unschoolers out there are back to school already.  You've been preparing for months but you still want some ideas stored away for a rainy day, or maybe just some newer ideas to add to your usual lesson plans.  So here you go!  This week on It's Playtime I bring you some great learning ideas posted during last weeks play date.  Enjoy, share, and add your own!  We are so glad you came to play.  

 I Heart Crafty Things put together this great lesson plan revolving around the book, Red Light, Green Light by Anastasia Suen.  She includes color sorting, math, language, and fine motor skills.    Perfect for boys and girls alike!  

Simple and beautiful, this fine motor skill activity from Share & Remember involves small suction cup bath mats and jewels.  Preschoolers will enjoy creating patterns and designs with an underwater theme.   
  Keeping Life Creative shared a DIY Recycled Crayon post, melting similar colored crayons together in cupcake papers, creating new, peanut butter cup shaped crayons.  While over at Slightly Nerdy. Sometimes Cool. they used Recycled Crayons to create their own rainbow crayons.  
Over at Tinker Lab, Rachelle's been working hard on her DIY Light Table and adding a different element to the learning experience...salt!  I love the prints and patterns that adding salt to the table creates.  

While on the discussion of Discovering Light, Beansprouts Preschool Blog took a boring, old sensory table full of cornstarch and shells and added some beautiful colored lights, creating a whole new sensory experience!

If you were featured this week, don't forget to grab your special "featured button."


Now, on to this weeks play date! 
It's Playtime is a community and Thursday link-up hosted by:

* Rachele : Messy Kids (That's me!)
* Anna : The Imagination Tree
* Rachel : Quirky Momma
* Jamie : hands on : as we grow
* Jenny : Let the Children Play

How to Play :
* Link up a post about a playful learning experience enjoyed by kids.
* Give us love and pop a button into your post/blog. Invite your readers to the weekly play date!


* Stop by one of our blogs every Thursday and add your link about play. Your link will show up on each of the blogs in the It's Playtime community.

* Each week the playtime hosts will choose favorite posts to feature. (By linking you are giving us permission to use an image and link to you, if featured.)
* Be sure to visit some of the links that catch your eye. Commenting on posts that you find interesting or inspiring is a wonderful way to develop your own playful community.

Wednesday, August 17, 2011

Baked Crayon Mess...umm...Art

While visiting education.com one day I came across a Baked Crayon Art (directions found by following the link) activity that looked fun and I had to try it.  So I set the activity up for my kids and they went to work .    
Ariel's task to was help peel all the crayons.  Michael tried but quickly lost interest.  
Paper isn't sturdy enough for this project, so we cut the sides off an old cereal box.  We covered some cookie sheets with foil in case the crayons melted over.  
 
 Ariel was more deliberate in the placing of her crayons and objects.  She even used foam letters to "sign" her name.  I warned her that once the crayon melted, it probably wouldn't look the way she wanted but like any typical 8 year old, she knew better then me.  
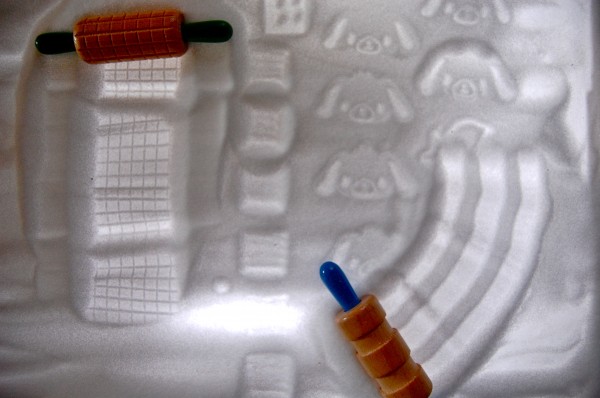
Michael tried using stickers, foam pieces, and an old rice and bean sensory mix for his art.  He started off placing items in specific places, but once he got to the rice and beans, he ended up coving his cardboard just for fun.  
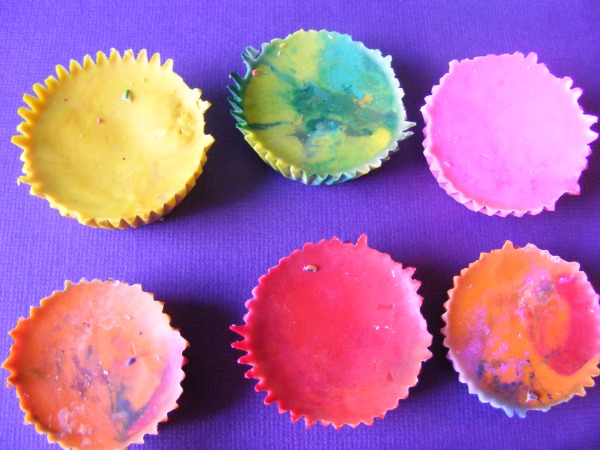
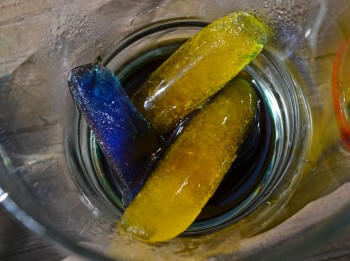
 We baked the art at 250 degrees for about 10 min.  The idea of this project is to allow the mess to cool only slightly so the kids can use a popsicle stick to move around the melted crayon creating a beautiful design.  I allowed ours to cool a little too long...
Over cooling wasn't too bad for Ariel since she had plenty of room to work with her melted crayon.  She found that scraping the wax could be fun too!  
Michael on the other hand was unable to do much more then pick rice and beans off the art.  
 Michael's mess...umm...art.  All that matters was he was proud of it!  
Ariel's project.  She was a bit frustrated that the design she created with the crayons didn't carry over to the melted version.  I did warn her!  

What we learned:
  • Foam letters and shapes shrink (you may think, "Duh!" but I didn't think about that a head of time)
  • As Ariel learned, creating a design doesn't really matter.  Crayons melt where they please.
  • Don't cool for too long or you won't be able to swirl the melted crayon.  If scraping is what you want, then go for it!  
  • Foil confetti curls (I know, I know...duh!)
  • Giving a 3 year old beans and rice to add to the project may not be the best idea as they will cover everything!  
I think we might just have to try this again one day...without all the added items...just crayons!

This Posting Featured/Linked On:

Getting Messy With Ms Jessi

Wednesday, August 10, 2011

It's Playtime: Ice is Nice


For many of us in the Northern Hemisphere, the Dog Days of Summer have arrived and ice play is everywhere on the web as we attempt to stay cool.  Last weeks It's Playtime link party was our most popular to-date, and it seemed to me, ice play/art was a favorite topic for bloggers to share.  This week, I've chosen some of my favorite ice projects from last weeks play date.  Enjoy....and stay cool!

I loved this Artsy Ice Experiment from Creative Connections for Kids.  They blended science with art (color mixing) and had nature (the summer sun!) do all the dirty work for them.  A great summer experiment!

Pre-school Play shared with us that sometimes planned projects take on a life of their own when a preschooler becomes involved.  A typical ice cube painting project quickly turned to Ice Cube (Body) Painting when this little one decided to explore her medium.  I wish I could paint my body and people think it's cute!  

A Salt and Ice Extravaganza came from Praises of a Wife and Mommy.  Salt is great for creating crevices in ice chunks.  Add some color and you have an artistic chemical reaction!  

The Chocolate Muffin Tree took salt and ice exploration one step further and created some lovely, Colorful Ice Sculptures.  I love the giant blocks of ice the little cubes and the big cubes created once they melted together.  

Honorable Mentions: 
The Iowa Farmer's Wife: Ice Play  (perfect for toddlers!)
Dimples & Giggles: Painting with Colored Ice
Walnut Acre: Farm Animals in Ice

If you were featured this week, don't forget to grab your special "featured button."


Now, on to this weeks play date! 
It's Playtime is a community and Thursday link-up hosted by:

* Rachele : Messy Kids (That's me!)
* Anna : The Imagination Tree
* Rachel : Quirky Momma
* Jamie : hands on : as we grow
* Jenny : Let the Children Play

How to Play :
* Link up a post about a playful learning experience enjoyed by kids.
* Give us love and pop a button into your post/blog. Invite your readers to the weekly play date!


* Stop by one of our blogs every Thursday and add your link about play. Your link will show up on each of the blogs in the It's Playtime community.

* Each week the playtime hosts will choose favorite posts to feature. (By linking you are giving us permission to use an image and link to you, if featured.)
* Be sure to visit some of the links that catch your eye. Commenting on posts that you find interesting or inspiring is a wonderful way to develop your own playful community.

LinkWithin

Related Posts Plugin for WordPress, Blogger...