Pages

Showing posts with label play dough. Show all posts

Wednesday, April 19, 2017

Spring Play Dough: An Invitation to Play


*This post contains affiliate links

Play dough is a staple amongst ECE educators.  It's a great tool for imaginary play, exploration, and helps to build-up the fine motor skills needed for writing.  It's also cheap to make.  I often use this no cook recipe from The Imagination Tree. It's what I used in the picture below.  I added yellow food coloring and green glitter  to make it "springy."


The dollar store is a handy resource for cheap exploratory supplies.  If you are like me, and don't go often, Amazon is fantastic too (not to mention it'll be delivered right to your doorstep).  When I go to the dollar store, it takes me forever because I'm hunting for anything I can use for art and sensory activities.  It's amazing what you can find, especially amongst the seasonal items.  And the containers!  So many cute ways to present invitations to play/explore as well as for storing said objects.


For this particular invite, I set out the homemade play dough, sparkly Mini Styrofoam Eggs, silk flowers, and plastic butterflies.  The other play dough tools are all on a low shelf for easy access.


This particular spring themed invitation allows a child to explore concepts of spring: plants/gardening, new life, insects (life cycle), and Easter (if one chooses).  This activity allows for independent play and free exploration of materials.

You may be asking, "what is an invitation to play?" and that would be a great question.  For an awesome tutorial, check out Creating the Invitation to Play on Teach Preschool and Creating Invitations to Play! on The Imagination Tree.  

If you wish to expand this activity through reading, you might try:


Monday, February 8, 2016

Valentine Playdough


*This post contains affiliate links

I love Valentine's Day.  Not because of the candy (but I do love candy!), but because of all the fun things you can do with kids.  There are no shortage of props you can purchase for inexpensive that can enhance any activity.  The dollar store is full of fun items to craft with, add to playdough, or use to create a fun sensory bin.  Valentine activities can be used all month long and is a wonderful way to teach kids about the heart shape and the colors red, pink, and purple (and how you mix those colors).  
Playdough is quite popular in our house.  My youngest (of 3) benefits from 13 year of collecting supplies, cookie cutters, and various tools which she can enjoy with her playdough.  I always have some on hand or am ready to make it, trying different recipes along the way.  


This beautiful, rose colored playdough is a no-cook recipe from The Imagination Tree.  I added some red food coloring (less for pink, more for red), glitter, and rose oil for a complete sensory experience.


As an invitation to play, I put out the playdough, some red faux diamonds, silk roses, foam heart picks, and heart DecoPics (cupcake decoration) . Most of this stuff I purchased at the dollar store.  There were no instructions, no "you must create this..."; just a table full of tools to explore.


When you provide an open play experience, you never know what your child will create.  It's all up to them.

Materials:
  1. Your favorite Playdough
  2. Various Valentine type/inspired items such as flowers, gems, cupcake decorations, floral decorations, etc  
Don't forget to leave a comment about your experience.  And feel free to share your pictures on my Facebook page!


Tuesday, March 12, 2013

Play Dough Rainbow Match


*This post contains affiliate links

Up until about 7 years ago, I had no idea rainbows had an order.  I don't remember that lesson in elementary school so I drew them, all willy nilly, including colors like pink or heaven forbid, turquoise.  I came from a family of artists so I knew about color combinations but for some reason, I never applied it to rainbows.

So now I know, my kids know (well, my 5 year old is learning, the order that is), and we have happy, normal rainbows. And we can create them in many different ways.  One easy way involves only play dough, a sheet of paper with a simple rainbow drawn on it, and a sheet protector (see picture below). That's it!  Of course you need play dough in the colors of red, orange, yellow, green, blue, and purple (or violet for you artist types) but that's easy enough to make or even buy if you so choose.
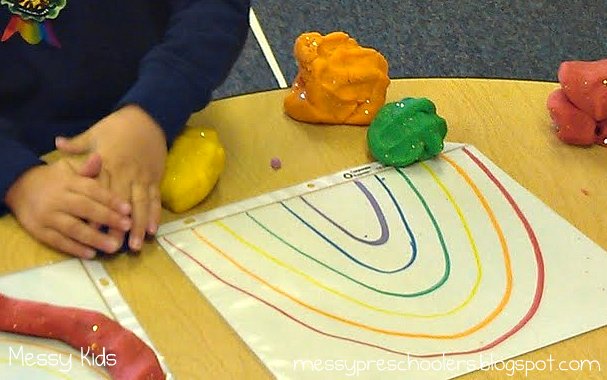

Play dough is a fantastic tool for strengthening fine motor muscles in the hands.  While your child is pushing, pulling, rolling, squishing, and forming the dough, they are developing the muscles needed for writing and hand coordination.

The sheet protector allows for easy clean-up as well as the reuse of your rainbow.  The kids will need to roll "snakes" from the different colors of dough.  Then they can match each colored snake to the corresponding colored arch on the rainbow.  Don't forget to talk about color combinations as they form their rainbow.


A bonus exploration to this project is discovering lengths.  As the kids form snakes, have them show you the short snakes and the long snakes.  You can also challenge them to see how long they can make a snake without it breaking.  For pre-k aged children, get out a ruler or unit blocks and measure each colored snake.  There are many ways to build on this project.


Don't be afraid to let your little one explore with other tools.  My son sticks all sorts of things in play dough: pencils, toys, marbles, spiky balls, acorns, pipe cleaners, etc.  He hides things in them too.  I have to go through all the play dough before I toss it because he leaves all sorts of treasures hiding amongst the dough.

Want to make your own play dough?  Here is my quick, go-to recipe from The Imagination Tree:

  • 2 cups all purpose flour
  • 1 cup salt
  • 2 tablespoons oil
  • 1.5 cups boiling water
  • 2 tablespoons cream of tarter (optional but it does make for smoother dough)
  • Coloring (gel colors or liquid water colors are most vibrant but regular food coloring works as well)
  • Scents and Glitter are fun and optional


Mix all the ingredients in a bowl. Knead dough until it's no longer sticky. It will be very hot so be cautious. If the dough is sticky add a little flour as you knead until it reaches desired play dough texture.  

What kind of rainbows have you been creating lately?


Friday, February 8, 2013

Mommy & Me Book Club: Valentine's Day


*This post contains affiliate links

Last year I started a Mommy & Me Book Club for the moms in my Meetup group.  Shortly after, I found out I was pregnant and was extremely tired (for months and months and months and....).  So while I continued to host for a few months, I never shared the activities we enjoyed.  Lucky for me, one of them was a Valentine's Day themed play date and what do you know...it's almost Valentine's Day!

Reading List: 


Activities:

I made some terrific no cook play dough (Thank you The Imagination Tree!), colored it pink, and added glitter and Rose Oil .  It was smellerific!  I provided the kids with diamond beads, red stones, heart cupcake decorations, silk roses, and these pink hearts on a stick.  All of which I purchased at the dollar store, except the cupcake decorations which my grandmother gave me.

For art, I folded a TP roll in half, which creates a heart shape and gave the kids red paint.  The TP roll is long enough that this project can be fairly mess less.  Unless you have boys...or little ones that like sticking their fingers into the paint...or boys....did I mention boys?  We were lucky on this day though, the boys were occupied with wrestling.

Snack:

  For snack I made Glitter Grapes.  Aren't they pretty?  And no added sugar!  Warning: this snack is as addictive as it is beautiful.    

Would you like to start a Mommy & Me Book Club with your friends?  Feel free to contact me with any questions you may have.

Thursday, July 19, 2012

Mommy and Me Book Club: Ocean Theme


It's been a long while since I've posted something other then It's Playtime.  It's not that we haven't done anything, but between preschool, being pregnant, and the other things that life tends to throw at me, I've  been a bit absent.  So I'm going to try and go back to some of our favorite activities over the past couple of months and blog about them.  Then, hopefully, I can start working on some newer ideas.

Last month (June) we had our monthly Mommy & Me Book Club at the house.  It seems to be a popular activity with my regular moms which pleases me.  The theme in June was The Ocean.  Here are the activities I made available.


  I made some Sand Playdough inspired by Timeless Adventures.  I provided some shells and floral stones (both purchased at the dollar store) along with some ocean characters.  The kids enjoyed creating different scenes and and experiencing the variety of textures.

We also created Octopuses from T.P. tubes like those found at Mommy with Selective Memory.  All you do is cut 8 strips, leaving room at the top for the "head".  I'm running low on paint, plus I have a lot of little guys, so we used markers to decorate the tubes.  Then the kids glued on google eyes.

For snack I used the recipe for Cinnamon Snowflakes I found on Come Together Kids but made a slight variation.  I used a fish cookie cutter create little tortilla fish.  Then I followed the directions on the original recipe, creating crispy, yummy, cinnamon fish.  These went fast!  


And what's a book club without books?!  We all came together and read:
  

Would you like to start a Mommy & Me Book Club with your friends?  Feel free to contact me with any questions you may have.

LinkWithin

Related Posts Plugin for WordPress, Blogger...