Pages

Showing posts with label preschoolers. Show all posts

Wednesday, April 12, 2017

Color Dripping: Spring Flowers


 *This post contains affiliate links

Recently I purchased some Pipettes because my 4 year old likes to play in water.  I figured, amongst many other things, she could use them for water transfer and creating "potions" outside.  I also know they are great for various art projects and color blending.  While browsing Facebook I came across a beautiful spring art experiment from Fun-a-Day that inspired me to decorate for spring.  So I set to work, which included creating some liquid watercolors.  


While I prefer how vibrant purchased Liquid Watercolors  can be, I didn't have any on hand.  But I did have a bag full of dried markers I'd been collecting.  You can repurpose these old markers by placing their tips in water and allowing them to soak for several hours, or overnight.  Then you can store the created watercolors in small plastic containers.


After creating the watercolors, I cut some coffee filters into flower shapes.  The nice thing about coffee filters is they are thin, so you can cut a number of them at once.  When all was ready, I set out the flowers, watercolors, and pipettes (one for each color) for my preschooler to play with.  I used a plastic box lid to contain the mess as best as possible.  A tray or cookie sheet could also work.  Some kids like to really soak their art work, so keeping it from running all over the place is important for your own sanity.


Pipettes are a great tool for developing fine motor skills.  Toddlers may find squeezing and transferring the liquid difficult.  If this is the case, give them a paint brush.  It'll still create a lovely work of art.


There are several ways you can take this activity.  If you want to teach simple color blending, try using only two colors at a time:

  • yellow+red= orange
  • blue+yellow=green
  • red+blue= purple
If you want to move beyond the basics, try multiple colors.  Some truly beautiful flowers can be created this way.  I explained to my daughter that it's best to mix the colors on the paper, rather then in the containers because otherwise you'll end up with all brown.  Of course, if your child is like mine, they will still test this theory.  I found if you use an ice tray for your colors, rather then giving them the storage containers, you'll waste less, and it can be easily dumped and replenished.  

As much as possible, stand back and allow your child to explore the activity.  It's OK to ask them questions about the colors they are blending but otherwise let them create.  Some may chose to not blend the colors.  That's OK too.  Sometimes the process is more important then the product.  


With Easter around the corner, we also painted some coffee filter Easter eggs.  Once all the flowers and eggs were dry, we hung them in the windows to catch the light and enjoy. 

Here's a list of what you'll need:
  • pipettes or droppers (paint brush for toddlers)
  • coffee filters
  • liquid water colors
  • Scissors (for cutting flower/egg shapes)
Have you used pipettes for color blending before?  Let me know how you did and what you think of this activity.  


Wednesday, January 27, 2016

Process Art for Groundhog Day


*This post contains affiliate links

Most kids like the idea of Groundhog idea; the idea that an animal can predict the coming of spring.  It's fun to think about and fun to "celebrate" at home or at school.  But when you search Pintrest for "Groundhog Day Activities" or "Groundhog Day Crafts" you find a lot of printables and fairly difficult craft projects that simply aren't appropriate for toddlers and young preschoolers.  I do love this Negative Art project from Tippy Toe Crafts, which is shadow-like, but still not process art.

Volunteering at The Duck Pond has many advantages.  One is being the large amount of arts and craft supplies the founder has collected over the years.  Being the artsy one in the group, I get to design the "make & take" projects used each week.  Working on February's projects, Groundhog Day stumped me.  We don't use printables at The Duck Pond and I'm trying to move our art towards more process and less craft, which is far more stimulating to the average 2 year old.  So I ventured into our supply room and pondered colors and materials that could represent Groundhog Day.  A simple yarn collage was the result.


I gave my daughter some supplies: various earthy shades of yarn, a piece of paper, and some glue.  My daughter, being a typical toddler, loves glue, and was immediately excited at the prospect of using more (she'd already done the weekly project earlier, which took a lot of glue).  She squeezed glue all over the paper and set out to piling the yarn on top of the glue.  I showed her that unless there is more glue, the piles of yarn won't stick.  She understood and spread things out a bit.


The beauty of this project is in it's simplicity.  Even young toddlers can explore the yarn and glue to create whatever they want.  If you are nervous about the amount of glue your child might use, then squirt some on the paper and allow your little one to add the yarn.  But I encourage you to let them do as much as possible, because that's the point of process art; it's not about the finished product, it's about exploring the materials and creating what the child desires.  Try to step back and give them the freedom to use their imaginations.

Materials:
  1. Yarn (earthy tones if you want the Groundhog Day theme). Cut yarn into various lengths. 
  2. Half sheet of Construction Paper
  3. School Glue
Enjoy watching your child and feel free to share their finished projects on my Facebook Page.


Tuesday, January 19, 2016

Easy Snowball Sensory Table


*This post contains affiliate links

A little over a year ago I moved from San Diego to the San Francisco Bay area.  It's been a big adjustment for me and the kids.  My son had to change schools (then change again when he entered a special education class at the beginning of the school year), we can no longer have a "beach day" in January because the water up here is freezing, and of course we all had to make new friends.  Boy, did I win the jackpot with that!  I've met some terrific moms since I moved which has kept me and my children active around town.  

Once of the places we visit regularly is The Duck Pond, a non-profit indoor play space in south San Jose.  Because it's non-profit, they relay on volunteers to help out during the 2 hour session they are open each day.  One of my friends was a regular volunteer and she talked me into it as well, along with another good friend.  Now we are all there at least once a week helping in various forms to keep the place running.  Over the year I've been there, it's been noticed that my talents lie with the craft projects and the occasional sensory activity.  I am extremely limited in these areas; no paint or super messy sensory items (rice, flour, sand, etc) of any kind, simply because the parents are required to be involved and many aren't.  Too much for us volunteers to have to clean up.  So, it's become a challenge for me, in a good way (keeps those gray cells working hard).   

Digging through supplies last week I came across cotton balls and styrofoam balls and the snowball sensory table was born!


Most of us, even The Duck Pond, have inexpensive water tables laying around for warmer weather.  Well, dig it out because it's not just for water!  Water tables have many uses, that I hope to explore over the coming months.  

For this table I kept it simple: cotton balls, styrofoam balls, cups, and some pretend ice cream scoops we had in our "snack shop" pretend play area.  That's it!  

When I put the table out, I had the cotton and styrofoam balls mixed together. The children quickly separated the two (sorting=math).   


Then we had all kinds of scooping going on.  Kids were scooping styrofoam balls, kids were scooping cotton balls.  Some were pretending it was snow, some pretended it was ice cream.  The smallest children enjoyed throwing the cotton balls into the air.  It was a frenzy of exploration and the parents were loving it!  


This is a perfect indoor activity for winter and rainy days.  The clean up is easy and I'm sure you have at least cotton balls and kids cups around your house to get this table going today.  Don't have a water table?  Try using a large plastic storage bin or if you want a smaller scale, use a plastic 6-Quart Storage Box (shoe box sized).

Materials:
I hope this activity will keep your kids sane during indoor weather.  Let me know how you liked it by leaving a comment or share your photos over on my Facebook page.  


Thursday, October 30, 2014

Toddler Friendly Tattooed Pumpkins


It's the night before Halloween and maybe, just maybe you are looking for one more way to decorate your pumpkins.  Something that doesn't require paint, knives, glitter, or glue.  Something you can do with your little one, as well as an older child.  If you are, then I have the pumpkin decorating idea for you!

What you need:
  1. A pumpkin (smoother ones work best but minis work too, as you can see from my picture)
  2. Temporary tattoos of choice
  3. Paper towels or a wash cloth
  4. Water
If you've ever placed a temporary tattoo on your child, you know what to do, except place them on the pumpkin.  It's that easy.  If you've never used temporary tattoos, here's what to do

 
Pick out the tattoo you'd like to place on the pumpkin.  Depending on what you have, like a sheet of designs, you may have to cut around the one you want.  Others come as individuals or with perforations that allow for easy tearing.  Make sure you remove the plastic before placing it on the pumpkin. Place the picture side on the pumpkin with the paper backing facing towards you (see Picture below).
Get your wash cloth or paper towels wet.  Not dripping, but pretty wet, and place over the tattoo, holding it on for about 30 seconds.  Afterwards, carefully peel the paper away from the pumpkin's surface.  If you don't hold the wet cloth on long enough or are too quick to pull the tattoo paper away, some of the picture may tear away.  That's O.K,  you can always wipe the tattoo away and try again.  Or leave it as I did with my daughter.  She was proud to do it on her own so I let it be.  If the tattoo is bunched a bit, simply use your wet cloth to gently rub and flatten the tattoo.  And again, if your toddler is "helping" and proud of what they have done, it's O.K. to leave it as is.  It's about the experience, not the finished product.    

This project can take as long as you allow or as long as your toddler/preschooler is interested.  This was a great mommies group activity and while some of the kids chose to play (while their moms enjoyed pumpkin decorating) a few of the kids (my daughter included) couldn't put enough tattoos on their pumpkin.  Once the pumpkin had enough, my daughter moved to her arms.

Sometimes it's the simplest decorating ideas that inspire us the most.  I've been absent to the blogging world for about 2 years now but it's time for a return.  I hope I can continue to bring you fun and engaging activities for your children and family.  Thanks for joining me again!    

*This activity promotes fine motor skills and counting.  If you have different pumpkins in your house, you could also talk about differences/opposites: Large, small, smooth, bumpy, etc.


Friday, May 31, 2013

Snail Painting


*may contain affiliate links

Let me begin by saying no snails were harmed in the making of this art.  Also if you are easily grossed out by slimy creatures then I'm sorry, because this post is full of them crawling around, getting kids slimy and stuff, trails of colored goo left behind.  Look away...or don't...preferably don't.

Snails are fascinating!  I've loved them since I was a little kid.  They are slimy but have the cutest faces!  I mean have you ever taken the time to really look at it?  Adorable!  They are also good artists.  To help your snails create art, you'll need a few items:

  • Food coloring or Liquid Watercolors
  • Several small, shallow containers (one for each color you plan to use)
  • Paper (a large sheet of butcher paper works best)
  • Snails
  • Magnifying Glass (optional)
This activity is easy peasy.  Simply fill you containers with water and add food coloring to desired shade.  Gently dip a snail into the color and place it on the paper.  Let the snails go nuts.

Look at how much fun they are having!  OK, I don't know if snails even have the concept of fun, but it sure looks that way.
The more snails you have the more colorful your art will be, but you don't want too many, unless multiple kids are involved, because they can be difficult to herd. 

  • Make sure you talk to your kids about being gentle with creatures great and small.  It's fun to explore but we don't want any casualties.  
  • If you have one, encourage children to use a magnifying glass to view the snails and study them.  
  • Yes, sometimes snails poop on their art and on little hands.  No biggie, simply wipe it up and wash your hands.  Wash after releasing the snails too!  
  • Please release your snails...or feed them to a box turtle; they love them!     

Wednesday, April 17, 2013

Messy Art on It's Playtime

It's Playtime will keep you busy and a bit messy this week....

Join fantastic fun & learning in the creative paint exploration and Paint with Rocks!  Use a canvas and this will be a keeper to brighten up your home.  

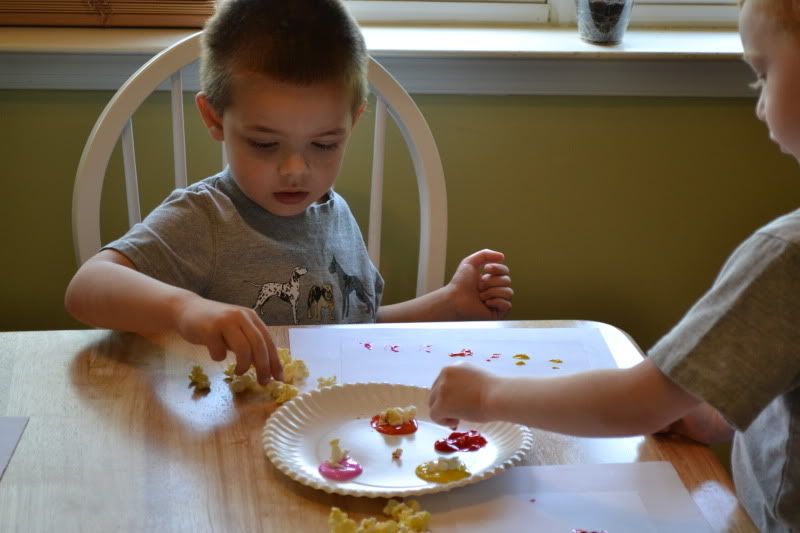
These kids from Mamas Like Me are painting with popcorn!  Check out how they turned popcorn painting into a beautiful Mother's Day card.

If you were featured this week, don't forget to grab your special "featured button."


These activities plus more can be found over on the It's Playtime Pinterest Board.  Happy Pinning! 

Now, on to this weeks play date! 
It's Playtime is a community and Thursday link-up hosted by:

* Rachele : Messy Kids (That's me!)
* Rachel & Holly : Quirky Momma
* Jillian: A Mom With a Lesson Plan

How to Play :
* Link up a post about a playful learning experience enjoyed by kids.
* Give us love and pop a button into your post/blog. Invite your readers to the weekly play date!


* Stop by one of our blogs every Thursday and add your link about play. Your link will show up on each of the blogs in the It's Playtime community.
* Each week the playtime hosts will choose favorite posts to feature. (By linking you are giving us permission to use an image and link to you, if featured.)
* Be sure to visit some of the links that catch your eye. Commenting on posts that you find interesting or inspiring is a wonderful way to develop your own playful community.

By linking up you give us permission to grab a picture and feature you here, on a site we write for, on FB or Pinterest.   If we share your link, we will always credit you, send people to your original post and use only ONE photo.

Tuesday, March 12, 2013

Play Dough Rainbow Match


*This post contains affiliate links

Up until about 7 years ago, I had no idea rainbows had an order.  I don't remember that lesson in elementary school so I drew them, all willy nilly, including colors like pink or heaven forbid, turquoise.  I came from a family of artists so I knew about color combinations but for some reason, I never applied it to rainbows.

So now I know, my kids know (well, my 5 year old is learning, the order that is), and we have happy, normal rainbows. And we can create them in many different ways.  One easy way involves only play dough, a sheet of paper with a simple rainbow drawn on it, and a sheet protector (see picture below). That's it!  Of course you need play dough in the colors of red, orange, yellow, green, blue, and purple (or violet for you artist types) but that's easy enough to make or even buy if you so choose.
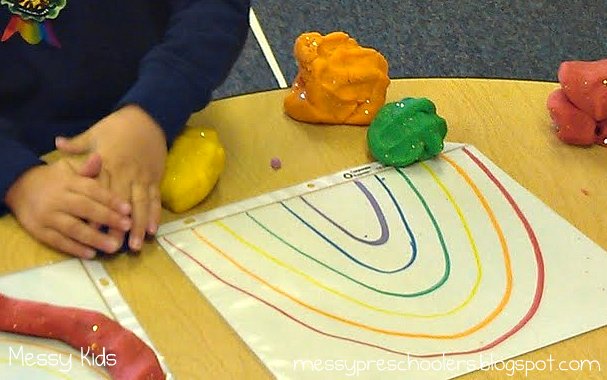

Play dough is a fantastic tool for strengthening fine motor muscles in the hands.  While your child is pushing, pulling, rolling, squishing, and forming the dough, they are developing the muscles needed for writing and hand coordination.

The sheet protector allows for easy clean-up as well as the reuse of your rainbow.  The kids will need to roll "snakes" from the different colors of dough.  Then they can match each colored snake to the corresponding colored arch on the rainbow.  Don't forget to talk about color combinations as they form their rainbow.


A bonus exploration to this project is discovering lengths.  As the kids form snakes, have them show you the short snakes and the long snakes.  You can also challenge them to see how long they can make a snake without it breaking.  For pre-k aged children, get out a ruler or unit blocks and measure each colored snake.  There are many ways to build on this project.


Don't be afraid to let your little one explore with other tools.  My son sticks all sorts of things in play dough: pencils, toys, marbles, spiky balls, acorns, pipe cleaners, etc.  He hides things in them too.  I have to go through all the play dough before I toss it because he leaves all sorts of treasures hiding amongst the dough.

Want to make your own play dough?  Here is my quick, go-to recipe from The Imagination Tree:

  • 2 cups all purpose flour
  • 1 cup salt
  • 2 tablespoons oil
  • 1.5 cups boiling water
  • 2 tablespoons cream of tarter (optional but it does make for smoother dough)
  • Coloring (gel colors or liquid water colors are most vibrant but regular food coloring works as well)
  • Scents and Glitter are fun and optional


Mix all the ingredients in a bowl. Knead dough until it's no longer sticky. It will be very hot so be cautious. If the dough is sticky add a little flour as you knead until it reaches desired play dough texture.  

What kind of rainbows have you been creating lately?


LinkWithin

Related Posts Plugin for WordPress, Blogger...