Pages

Tuesday, January 31, 2012

The Heart Project: Sharing Our Hearts For the AHA


I've learned over the past year that blogging can create community.  And when you have a community, great things can happen.  The Heart Project is a great thing.

The Heart Project is a collaborative project created by Jamie @ hands on: as we grow  in support of her husband's 4 year old cousin, Ellie (read her story here), and realized by over 70+ bloggers from all over the world.


What is The Heart Project?
The Heart Project is a beautiful book of over 100 heart photos relating to projects with children in mind.  These projects were either developed for kids, created by kids, or made for kids and cover a wide range of subjects including art, crafts, cooking, and home decore.
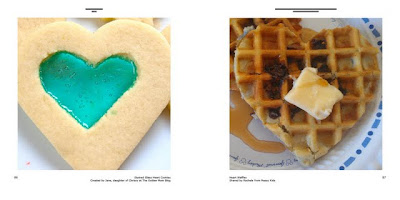
Here is an official sneak peak:


See those waffles?  I am thrilled to be a part of this project!

So, What Can I Do?
You can donate of course!  The ebook is available with a $5 donation to the American Heart Association (AHA).  
Add to Cart
You'll have these wonderful projects right on your computer and can feel good you contributed to a worthy cause.  But you must hurry, this book is only available for donation through the month of February!  


Bonus Donation!!!!
For every book sold this month, craftprojectideas.com will donate $1 (up to $500).  So for your $5 donation, craftprojectideascom will also donate $1.  Isn't that awesome?  Don't forget to leave them a thank you note on their Facebook page!
craftprojectideas.com showing the love
BUT Maybe you'd rather have a printed copy of the book.  A book to share with your co-workers, family, friends, etc.  A book you can place on your coffee table and feel good about.  For $20 (+ $3.59 S/H) your can receive a beautifully printed, full color, 8.5"x 8.5" edition for your home, office, school, etc.  $5 of every book sold will be donated to the AHABut you must hurry, this book is only available for donation through the month of February!  
US $20.00
Order the Printed Version

Of course, you can also make a donation without purchasing the book.  

And There is More!
Auctions and giveaways galore.  We want to thank Melissa & Doug as well as Fudoo Boards for the wonderful sponsorship!

Fundraiser Auctions:
♥  All proceeds of each auction will go to the AHA  ♥

Melissa & Doug -  4 Trunki with Teddy Bear Auctions!

  1. Trunki with Teddy Bear, ends Feb 10
  2. Trunki with Teddy Bear, ends Feb 10
  3. Trunki with Teddy Bear, ends Feb 10
  4. Trunki with Teddy Bear, ends Feb 10


Fudoo Boards - 3 Fudoo Board Kits for Auction!
  1. Fudoo Board Kit, ends Feb 10
  2. Fudoo Board Kit, ends Feb 10
  3. Fudoo Board Kit, ends Feb 10

And check out these great daily giveaways!

Heart Project Participants
hands on : as we grow
A Little Learning for Two Among Many Blessings
Angelique Felix
At Home with Ali Broken Treasures
Busy at Home
Busy Kids Happy Mom Carrie Saindon's Photo Journey
Child Central Station
Classified: Mom Classroom Magic
Creative with Kids
Creativity My Passion Critters and Crayons
De Tout et de Rien
Dilly-Dali Art Dinosaurs & Octopuses
Excited 2 Learn
Hand Over the Cookies Handprint & Footprint Art
Happy Hooligans
Heart Journey Imagination Soup
Jamie's Jumble
Kitchen Counter Chronicles Kreative Resources
Let Kids Create
Little Illuminationss Living Montessori Now
Loudness of the Lambs
Love and Lollipops  Mama, hocemo nesto da pravimo
Mama Pea Pod
Mama Smiles  MemeTales
Messy Kids
Mindful Meanderings  Mom to 2 Posh Lil Divas
Mommy Labs
Mommy Perks  Mum Paints Lives
Mummy Mummy Mum
My Creative Family  NurtureStore
One Artsy Mama
Peace Love & Rainbows  Play Dr Mom
Putti Prapancha
Rainbows within Reach  Reading Confetti
Ready. Set. Read!
Red Ted Art  Sense of Wonder
Share & Remember
Stacy Molter  Sun Hats & Wellie Boots
Teach Preschool
The Artful Child  The Chocolate Muffin Tree
The Craft Barn
The Educators' Spin on It  The Golden Gleam
The Imagination Tree
The Iowa Farmer's Wife  The Joy of My Life
The Kids Fun Review
The Outlaw Mom Blog  The Preschool Toolbox
The Seeds Network
Toddler Approved

Our group goal is $1000!  Help us reach that!

Sunday, January 29, 2012

From the Heart Waffles


Breakfast is the favorite meal in our household, especially on weekends.  I make crepes, muffins, cinnamon rolls, and waffles.  So this morning I asked my son what it was he wanted me to cook.  I suggested blueberry pancakes but he said, "no, blueberry waffles".  We haven't tried this before so it was worth a shot.

As I was making the waffles, I thought about how I could make them special.  My son, like most kids, loves when I make cut-outs of anything.  I remembered I had a great big heart cookie cutter in the cupboard, perfect for a big waffle.

Once the waffles were finished baking in the waffle maker, I carefully peeled them off, placed them on a flat surface, and pressed the cookie cutter down to create perfect heart-shaped waffles.  I set the trimmings aside because in my house, waffles are snacked upon all day long.

My son was thrilled with the fun shape, so much so he didn't want me to cut it into bite size pieces.  Unfortunately for him I had already covered them with syrup and didn't want him using his hands (which he did anyway).  He also wouldn't let me take a picture of him enjoying the yummy creation.


Here's what you'll need:
Waffle Maker
Bowl
Whisk
Wooden Spoon
Butter or Cooking Spray

For the Waffles:
1 3/4 cups all-purpose flour
1 tablespoon baking powder
1/4 teaspoon salt
2 eggs
1 3/4 cups milk
1/2 cup cooking oil
1 cup or so blueberries (frozen or fresh)

Combine all ingredients in a mixing bowl.  Stir mixture first with a wooden spoon, then with a whisk until all ingredients are well combined.  Do not overmix!  Batter should be slightly lumpy.  Fold in blueberries until well combined.

Coat waffle iron with butter or cooking spray.  A heavy coat will be needed because the blueberries stick!  The size of your waffle maker will determine the amount of batter you pour onto the grids.  I use about 1 cup (my maker is on the larger size)

Cook your waffle according to manufactures directions.  Use a fork to remove waffle off the grid.  Place on a flat surface and cut waffle with desired cookie cutter, in this case, a heart.  Serve with butter, syrup, blueberries, whip cream, or any other topping of choice.

And of course, serve with LOVE.

Recipe variation based upon:
"Waffles." Recipe. Better Homes and Gardens: New Cook Book. Iowa: Meredith Corporation, 1989. 152-3.

Wednesday, January 25, 2012

It's Playtime: Painting with WHAT?

I'm a bit under the weather this week so I'll keep it short and sweet.  Painting is about exploration.  It's easy to hand a kid a paint brush and say, "go, have fun".  But what happens when you hand a child a toilet plunger or bathroom scrubbies and tell them to paint a picture?  At first, they will probably look at you a little funny, but then, they explore the materials and discover how THEY like to use them.  There are so many different ways to paint and discover creativity!  Check out the objects these bloggers gave their children to use.  

Play Create Explore found some Weird Objects for Painting at the thrift store.  Each brush is unique and can be used in a variety of ways.  Need some cool brushes?  Check your local $1 store!

Brushes and scrubbers aren't the only items little ones can explore with paint.  Do you have a gazillion plastic animals or dinosaurs laying around?  Why not create some Animal Prints like the Rainy Day Mum?
 Pre-school Play had fun with Squeezy Bottle Painting.  Awesome fun, fantastic mess!

If you were featured this week, don't forget to grab your special "featured button." 


Now, on to this weeks play date! 
It's Playtime is a community and Thursday link-up hosted by:

* Rachele : Messy Kids (That's me!)
* Anna : The Imagination Tree
* Rachel : Quirky Momma
* Jamie : hands on : as we grow
* Jenny : Let the Children Play

How to Play :
* Link up a post about a playful learning experience enjoyed by kids.
* Give us love and pop a button into your post/blog. Invite your readers to the weekly play date!


* Stop by one of our blogs every Thursday and add your link about play. Your link will show up on each of the blogs in the It's Playtime community.
* Each week the playtime hosts will choose favorite posts to feature. (By linking you are giving us permission to use an image and link to you, if featured.)
* Be sure to visit some of the links that catch your eye. Commenting on posts that you find interesting or inspiring is a wonderful way to develop your own playful community.

Wednesday, January 18, 2012

It's Playtime: Under the Sea


I don't know about you, but I love sea life!  If I could visit an aquarium everyday, I'd never grow tired of it.  It's peaceful and I find sea creatures amazing.  I also love ocean themed preschool activities. They tend to be as colorful and unique as the sea animals themselves.  Last week on It's Playtime, there were numerous underwater creations shared by bloggers, so I've picked my favorites and here they are!  

 At Home with Ali created this lovely Marine Sensory Tub using colored rice.  The mixture of the greens and blues is outstanding!  

Chicken Babies celebrated a birthday with a Dolphin Themed Birthday Party.  They played some great party games perfect for a crowd or a rainy day indoors.  I love the kids jumping through the hoops!

Mommy with Selective Memory shared these Easy Octopuses From Paper Towel Holders.  

Sea Creatures Ice-Cubes from Make Do & Friend are great for sensory tub or bath tub play. Kids will work hard to get these frozen treasures out of the ice!  

If you were featured this week, don't forget to grab your special "featured button." 
  

Now, on to this weeks play date! 
It's Playtime is a community and Thursday link-up hosted by:

* Rachele : Messy Kids (That's me!)
* Anna : The Imagination Tree
* Rachel : Quirky Momma
* Jamie : hands on : as we grow
* Jenny : Let the Children Play

How to Play :
* Link up a post about a playful learning experience enjoyed by kids.
* Give us love and pop a button into your post/blog. Invite your readers to the weekly play date!


* Stop by one of our blogs every Thursday and add your link about play. Your link will show up on each of the blogs in the It's Playtime community.
* Each week the playtime hosts will choose favorite posts to feature. (By linking you are giving us permission to use an image and link to you, if featured.)
* Be sure to visit some of the links that catch your eye. Commenting on posts that you find interesting or inspiring is a wonderful way to develop your own playful community.

Monday, January 16, 2012

From Art to Science: Solids and Liquids


I wanted to paint the other day, but my son had other ideas.  He asked to melt crayons again.  Thrilled he was interested in creating anything, I plugged in my griddle and prepared to grant my son some melty fun.  

 He started by drawing, first a single crayon, then a handful of crayons.  
Then he decided to experiment.  He wanted to find out what would happen if he placed crayon pieces onto the griddle.  He was excited to see them melt into puddles.  Suddenly this art project turned into a lesson in solids, liquids, and heat.  When we made applesauce, we discussed heat and it's power to change things.  But apples don't puddle, only soften, so we decided to experiment with other items and discover what would turn into a liquid and what would remain solid.
We started with butter, then added a chocolate chip.  
But I also wanted him to see that not everything will melt, so upon my suggestion, we added a carrot and a grape.
After a few minuets, Michael noticed the carrot and the grape weren't doing anything exciting, and the butter was melted, so we added an ice cube too.
 He watched intently as the ice melted, the butter spread, the chocolate began blending into the mix, and the carrot and grape remained the same.  I asked him to show me which items were liquid and which were solid.  Then as suddenly as the lesson had begun, it ended (4 year old attention span).  We'd enjoyed some impromptu science...
while making a pretty cool piece of art!  

Additional: 
Later, while reading The Snowy Day by Ezra Jack Keats, we discussed the snowball Peter places into his pocket.  I asked Michael what would happen to the snowball in the house.  He said, "it will melt".  When asked why, "because it's warm in the house".  By George, I think he's got it!

Friday, January 13, 2012

Snowmen at Preschool


Snow is rare in Southern California and non-existent in my area, so when we want to build snowmen, we have to be a little creative. Today at my son's preschool we built "snowmen."  It was a fantastic collaborative project and the kids had a great time.  Of course, this can be built at home too!  Simply modify my directions to suit your needs.  Here's what to do:

Materials:
  • 6 white trash bags (3 for each snowmen)
  • Lots and lots of newspaper
  • Tape- Wide masking tape is preferred
  • Clothing items- hats, scarves, mittens, dress-up clothes, etc
  • Twigs

 Directions:
  1. Wad-up lot's of newspaper.  Let the children help, give it to room helpers, etc...whatever you need to do to have a giant pile of newspaper.  
  2. If you have a large class and at least 1 co-teacher, break the children into two groups.  This is not a race!  It simply makes life easier if you have a large class.  Our kids were divided into boys and girls.  Give each group 3 trash bags.  
  3. Talk about building a snowman.  How many balls do you need?  Are they all the same size?  What are the sizes (small, medium, large)?  
  4. Hold the trash bag while the children fill it.  Once you have a large ball, tie it shut.  Hold the next trash bag and fill it slightly less full as it's the medium ball.  Repeat making a small ball for the head.  
  5. Using tape, attach the balls to each other in proper order.  Use whatever technique you find easiest.  
  6. Send your kids around the classroom to find items for the eyes, nose, mouth, buttons, etc.  One of our groups used coins for eyes, while the other used legos.  Let the kids be creative.  Attach the items with tape.
  7. Dress your snowman. 
  8. Name your snowman
  9. Bring the class back together and talk about what's the same (two eyes, a nose, etc) and what's different.  

As you can see from the picture above, the girls team designed a female snowperson who was "getting married".  They used coins for the eyes, legos for buttons, gave her a skirt, cowgirl hat, scarf, and veil.  Her name was Melody and she was ready to marry Eric.  Their snowperson had a complete story line, providing extra personality.

The boys, on the other hand, created a male snowman.  He had legos for eyes, plastic piping for a nose, a train track for a smile (which I think was very creative), a costume tied around his neck for a scarf, twigs stuck into the bags for arms, and a wizards hat adorned his head.  The boys named their snowman Tree.

What the children learned:
  • Proportions
  • Cooperation
  • Same & Different
  • Creativity
  • Pride in a job well done!
Have you made a snowman at home or school?  Tell me about it and/or share your link in the comments below!  

Need a book to share with your little snowmen?  

This page shared on:

No Time For Flash Cards

Wednesday, January 11, 2012

It's Playtime: Camping....Indoors!


I don't know about you, but thanks to the influence of T.V. my son is dying to go camping.  He's seen Max and Ruby roast marshmallows, sleep in tents, and tell stories around the fire and thinks it would be a blast.  I agree with him.  I love camping!  My parents took me several times a year when I was a child and I always had a good time.  Unfortunately, not only does my husband have zero interest in sleeping on the ground outdoors, but we don't own a tent.  I hope to remedy this in the spring so we can camp-out in the backyard this summer, but until then, indoor camping will have to do. Check out these great posts from last weeks It's Playtime featuring indoor camping.   

Create with you hands had some Creativity with Cardboard Boxes, making a fun indoor tent.  Blankets and pillows completed the play space for comfort and lazy afternoons.  

Everything and Nothing jazzed up their Reading Corner with a tent, play camping light, and even a pretend campfire with cooking pot!  Add a sleeping bag (which they did!) and your child is ready for a reading adventure.  

As for us, my son has settled for a good ol' Blanket Fort on his bunk bed.  It's great for reading, hand shadow puppets, and when the time is right, sleeping.  

If you were featured this week, don't forget to grab your special "featured button."
  

Now, on to this weeks play date! 
It's Playtime is a community and Thursday link-up hosted by:

* Rachele : Messy Kids (That's me!)
* Anna : The Imagination Tree
* Rachel : Quirky Momma
* Jamie : hands on : as we grow
* Jenny : Let the Children Play

How to Play :
* Link up a post about a playful learning experience enjoyed by kids.
* Give us love and pop a button into your post/blog. Invite your readers to the weekly play date!


* Stop by one of our blogs every Thursday and add your link about play. Your link will show up on each of the blogs in the It's Playtime community.
* Each week the playtime hosts will choose favorite posts to feature. (By linking you are giving us permission to use an image and link to you, if featured.)
* Be sure to visit some of the links that catch your eye. Commenting on posts that you find interesting or inspiring is a wonderful way to develop your own playful community.

LinkWithin

Related Posts Plugin for WordPress, Blogger...